Fitting EPDM
Although the thought of fitting an EPDM roof may seem quite daunting it is in fact relatively easy process. Below is a guide to fitting a typical roof, and as you can see it is easy to install and get perfect long lasting results.
Frequently asked questions by DIYers
Q.
Do I need any special tools to install an EPDM roof system?
A. No! You only need the usual handyman tools such as saw,
screwdriver, utility knife, scissors, hammer etc.
Q.
Should I wait until my roof is leaking before I do anything?
A. No! EPDM can be installed over your existing
roof thereby avoiding the water damage associated with a leaking
roof and giving you peace of mind (and less work as you don't have
to replace any boards).
Q.
Do I need to replace any timberwork?
A. No! Unless it's rotten or water damaged.
Q.
Do I need to strip the felt off my roof before I start?
A. Only if your roof decking is soft or rotten as the system uses a
geotextile barrier membrane, which is laid on the roof prior to
laying the rubber membrane.
Q.
Does the roof need to be perfectly dry before installation?
A. Your roof will never be perfectly dry as all flat roofs have a
certain amount of water retention although the drier the better even
though the rubber membrane breathes due to it being vapour
permeable.
INSTALLATION GUIDE
It should be noted that although it is not strictly necessary on very small roofs it is recommended that all installations be carried out by at least two persons for ease of installation and for safety.
Comprehensive instructions are supplied with every order. As well as a back up service in case you have any difficulties.
STEP
1
Firstly, the roof is swept clear of all loose chippings and debris
and the substrate is checked for any water damaged timberwork and
replaced if required.
STEP
2
The underlay is fitted to the roof .
STEP
3
If
the roof is designed to flow off into a gutter, a skirting will be
attached.
STEP
4
The rubber sheet is positioned on the roof approximately 6"
back from the gutter edge and stapled or tacked to the outside edge
of the sheet.

STEP
5
Whilst
the batten is on the roof, the rubber sheet is draped down the wall
and nailed or screwed through the batten, level with the roof. Make
sure there is sufficient overlap each end to be able to fix down on
the sides of the roof later

STEP
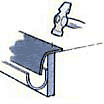
6
When the batten is in place the sheet is brought back over to form a
secure internal fixing.

STEP
7
If the roof adjoins the house wall, this can be bonded up the wall
and into the seam between the brickwork. Or under existing lead
flashing if it is sound.

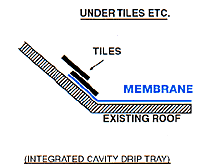
If the flat roof adjoins a pitched roof, the rubber membrane will be taken up under the tiles approximately 12" (minimum) and fixed to the roof timbers.
STEP
9
Where there is an upstand to the edge of the roof, the old felt will
be removed where it overlaps the fascia board and the rubber
membrane will then be bonded up and over the upstand and 2"
down the fascia any surplus should then be removed. The rubber
should be folded tidily around the corners and fixed in place. The
aluminium trims are then fitted to all upstands fitted this is best
done through the front face of the trim but fixings can be applied
through the top face, if the upstand is large enough and care is
taken to ensure a water tight seal.

STEP
10
Once
the rubber membrane is fixed and in place, it only remains to
ballast the roof using either rounded gravel or lightweight patio
flags, providing the roof is suitable.